There is a tool that allows you to set password protection for a specific folder. Just go to the Advanced > Password Protection section of the Web Hosting Control Panel.
Click on the New Password Protected Area button.
Select your domain from the “Drop-down menu” or type the full path to the protected folder in the “Path” field (e.g. /www/my-best-domain.com/protected_folder). Enter the username and the corresponding login password. Click the Add PPA button to confirm.
If you need to set more users, repeat the above steps, just use different usernames.
IMPORTANT: If there is an .htaceess file within the protected folder, the protection would not work, so either remove it or consider another password protection technique.
Uploading a lot of files to your hosting space could be a burden if your Internet connection gets interrupted.
Besides, your FTP client opens a new connection for each file in the upload queue, thus taking more time for the files to upload.
The more the files you are trying to upload are, the longer the upload time will be. For that reason, we have included a useful function in the File Manager tool in your Web Hosting Control Panel – unzipping an archive that has been uploaded on the server.
If you want to upload a whole website, you can archive it using a freeware archivator like WinRar or 7Zip.
Upload the file in the corresponding folder, for example /www/my-best-domain.com either via FTP or via the File Manager (Files > File Manager) tool.
Then open the File Manager tool and navigate to the folder where you uploaded the file. You should see the archive that you have just uploaded.
Right Click on the file name – a small window opens, prompting you what you would like to do.
All options are listed in a drop-down menu.
You can open the file with a WYSIWYG editor, a plain text editor or in a browser.
To unpack the archive file in the current folder, you have to select the Extract option.
You can also zip (create an archive) a whole folder by clicking on the Compress icon. The supported archive file types are .zip, .rar, and .tar.gz.
By choosing the Zip/Archive option from the drop-down menu, you can create a zip file of all the files within that folder, making it easier to download the entire folder at once.
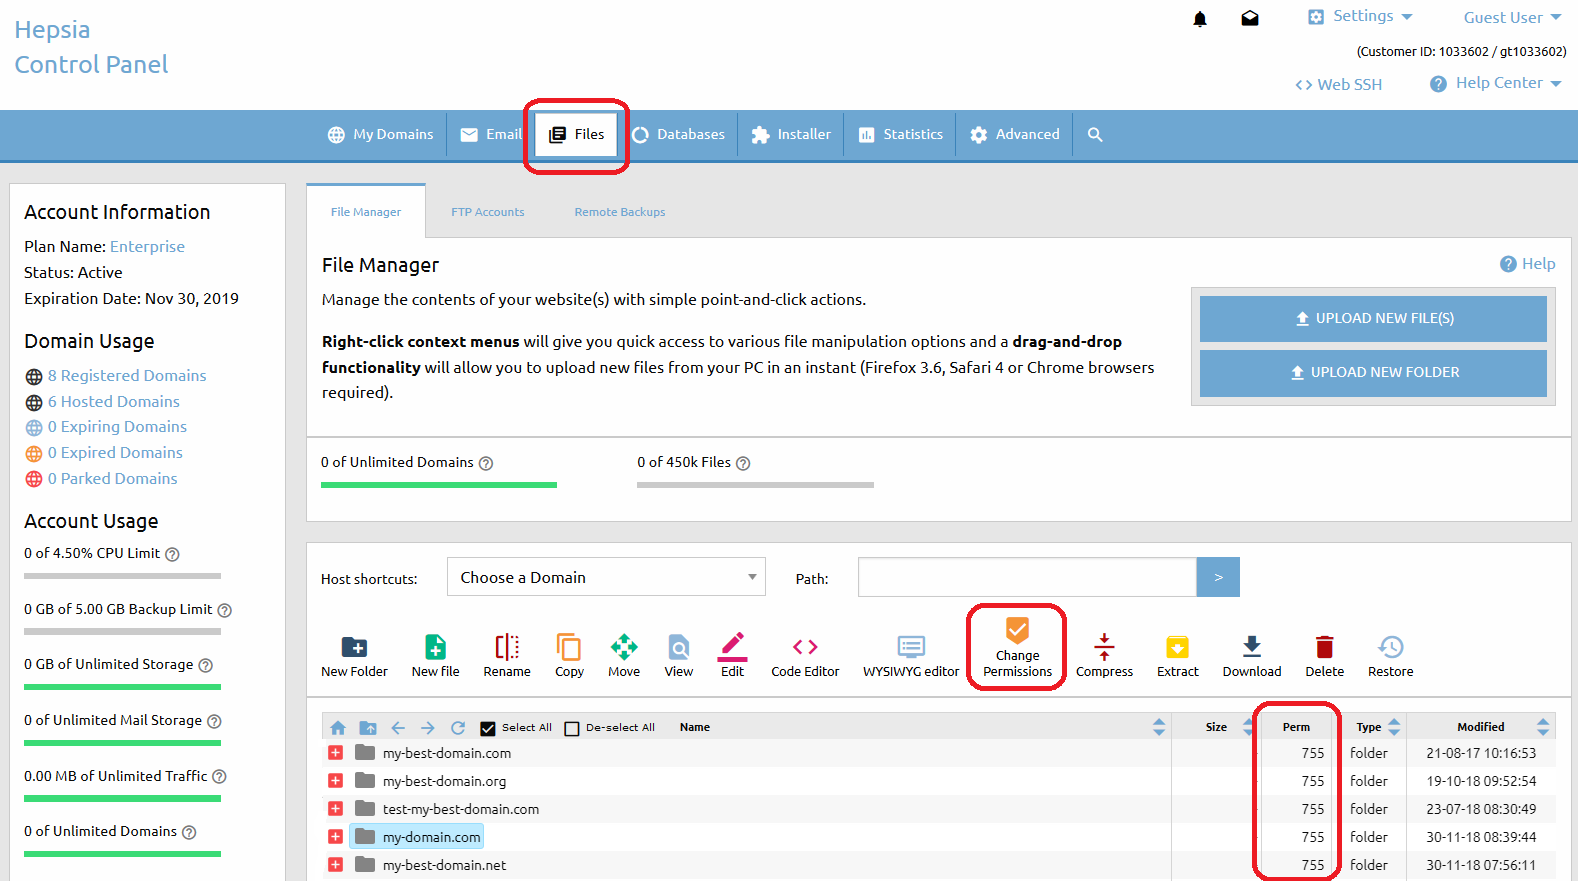
Sometimes when you install a script manually, you would see an instruction “change the permissions of file.php to 666“, for example.
Those permissions are associated with the read, write and execute rights that the file owner, group members and everybody else has for that file.
There are several ways to change the permissions of a file or a folder – through the File Managersection, SSH, or through an FTP client, such as FileZilla.
If you go to the File Manager section of the Web Hosting Control Panel (Files > File Manager), you will see a column “Perm“.
There is a value for every file or folder in your account, with default values 644 for files and 755 for folders.
If you want to change the permissions of a particular file or folder, simply click on the Change Permissions icon from the top list menu or click right button of the mouse. A drop-down menu will appear and you have to choose Change Permissions. A small window will show up and you’ll be able to choose the new value.
If you want to change the permissions of multiple files or folders, you have to select them first, then select the Change Permissions icon located at the top of the File Manager section.
Click on the Change button for the changes to take effect.
An alternative to using our File Manager tool would be changing the file permissions using an FTP client.
That option would also give you the opportunity to change the permissions of all subdirectories and files within a folder recursively.
We recommend FileZilla, a freeware FTP client. Here is how you can change the permissions using that client:
First, connect to your account on the server via FTP to see a list of all the files and folders that you have.
To change the permissions, right-click on a file and choose the File Attributes option. You can type a numeric value or choose the Read/Write/Execute permissions marking the checkboxes.
If you choose the File Attributes option when you right-click a folder, you will see an extra option – Recurse into subdirectories.
You can change the permissions of all the files, all the folders, or both, as long as they are located in the folder you have just clicked on.
Last, but not least, you can change the permissions via Secure Shell (SSH) if it is active for your account. The command is:
Here are step-by-step instructions on how to move your emails from the previous hosting provider:
Option 1: Works in all cases (does not require assistance from your current/old provider)
Set up an IMAP account for each of your mailboxes, using a mail client like Outlook, Thunderbird, etc.
If you are not sure, ask your old hosting provider what the IP of the IMAP mail server you need to connect to is.
Detailed information on how to set up a POP3 account could be found in the email related articles.
Step 1: Download all your emails locally (including all the folders that you might have, like Sent, Draft, etc.) to your computer using the IMAP accounts.
Step 2: Update the domain name servers (if you haven”t done it yet) to the ones listed in the Hosted Domains section of your hosting Control Panel.
Step 3: Create all the mailboxes that you will be using via the Email Manager section of the Control Panel.
Step 4: You will now have to create IMAP accounts in your mail client for each of the mailboxes. Please note that the previously created IMAP accounts must remain – do not delete them yet!
Step 5: Once you have the two IMAP accounts for each mailbox, just drag and drop all the messages and folders from the IMAP account with the old hosting provider to the new one. This way you will upload all the emails from your computer to our mail server.
Option 2 – May requires assistance from your current/old provider
Step 1: Check with your old hosting provider if you can have access to the /mail/ directory. There should be folders for each of your email accounts that you have to download to your computer.
Step 2: Create all the mailboxes that you will be using from the Email Manager section of your Control Panel.
Step 3: Upload all mailbox folders to your hosting account with us, using FTP. The folders could be uploaded directly to the /www/ directory. Each of your mailbox folders (e.g. mail@my-best-domain.com) should contain the following sub-folders: “cur” and “new”.
Step 4: Go to the File Manager section of the hosting Control Panel and navigate to the directory which contains the uploaded folders from the old hosting provider.
Copy all the files as follows: – from /www/uploaded-mail/mail@my-best-domain.com/cur/ to /mail/mail@my-best-domain.com/cur/ – from /www/uploaded-mail/mail@my-best-domain.com/new/ to /mail/mail@my-best-domain.com/new/
If you experience problems – check if /mail/mail@my-best-domain.com/ and the subfolders have permissions 755.
Log into the mailbox and see if the messages were copied successfully.
For your convenience and safety we provide the option to enable Anti-SPAM protection for any mailbox that you have with us.
This is an automatic protection based on multiple criteria, which can filter all incoming mail and protect your email account(s) from different types of SPAM (including virus-infected mail attachments).
There are 3 options to activate the Anti-SPAM Protection option for a certain mailbox:
OPTION 1: Enable Anti-SPAM Protection for several email accounts.
Go to the Email Manager menu in your Control Panel (Email > Mailboxes tab).
There you will see a list of all existing email accounts.
You can select each of these email accounts (put a check mark in front of it). Above the list of mailboxes, there are rows with identical buttons – the second one is the Anti-SPAM button.
OPTION 2: Using the icon located in Actions column. If you want to enable the Anti-Spam option for certain mail you must click on the red icon. Once the option is enable, the icon will be green.
Once you select the desired email account(s) and click on the Anti-SPAM button, you will be forwarded to a page where you will be able to select the level of protection and choose between two SPAM message options – to delete or to forward them to an e-mail address specified by you.
IMPORTANT: The higher the level of protection you choose, the better the chance of rejecting a valid e-mail message that you actually wish to receive will be.
It is recommended that you start off with a lower level or use the option to redirect the SPAM messages so that you can review them manually.
OPTION 3: Go to Mailboxes > Spam section of your Contron Panel and click on the “Activate SPAM Protection” button. From this section, you can activate and control the Anti-spam protection levels for your email accounts.
SPF (Sender Policy Framework) is a way to prevent sender address forgery in emails. SPF will not directly stop SPAM (junk email).
It will give domain owners a way to define which mail sources are legitimate for their domain and which ones are not.
To enable SPF for your domain, go to the Email > SPF Manager section of your Control Panel.
Choose the exact domain name you wish to protect and switch the Status to ON from the drop-down menu next to your domain name.
If you’re using our mail service, all you need to do is check the box labeled “Allow my domain’s MX records only” under the IPv6 field—that’s it!
This means that only the MX records stored for your domain name in the DNS zone will be able to send mail on behalf of your domain name.
If not, here are the required settings for each field:
Hosts: Fill in a list of all the hosts, which are authorized to send mail on behalf of the chosen domain name, e.g. mail.my-best-domain.com. Separate the hosts with a space or a comma.
IPv4: Type in the IP address of your SMTP mail server (e.g. mail.my-best-domain.com). Please have in mind that most of the mail servers have more than one IP address and in order to determine all of them, you can use an online tool like the one at https://www.whatsmydns.net/.
IPv6: Leave this field blank.
Once all the above is done, click on the Edit SPF Protection button. Please note that the SPF Record propagation may take up to 24 hours.
Email signatures provide a great way to personalize and automate certain features of your email correspondence. Using signatures you can enrich each individual message by adding plain text, pictures, links or a business card and make it more appealing to friends and familey, clients, partners and business associates.
In this article, we’ll focus on how to add signatures using the most popular email applications – Microsoft Outlook, Mozilla Thunderbird and Apple Mail, plus the webmail clients your Control Panel is equipped with – RoundCube Webmail.
Microsoft Outlook Once you have configured your email account successfully in Outlook, please navigate to the Tools > Options section. Locate the tab named Mail Format, click on it and then select Signatures. A new configuration window will appear where you’ll need to click on New and choose a name for your signature (if you have more than one e-mail account set up in Outlook, you will also need to specify the appropriate account for the new signature). Once you have done that, you can customize your signature with different fonts, text size, alignment, as well as pictures or hypertext links. As a final step, please click on OK in both menus and from this point onward, all outgoing e-mails will contain your newly created signature.
Mozilla Thunderbird In the popular open-source email client Thunderbird, signatures are handled using external files. This means that you need to create a new plain text or HTML file and then “tell” Thunderbird where it is located so that it could be used as a signature in your emails. Once you have created a .txt or an .html file with your signature, open Thunderbrd and go to Tools > Account Settings. In the following menu, please navigate to your email account and select the box that says Attach this signature, click on Choose and locate the signature file using the navigation window. You are also free to add the same file to as many email accounts as you want. Once you are done, click on OK.
Apple Mail Beside Mozilla Thunderbird, Mac users can also take advantage of the Mail application that comes built-in with every Mac OS X installation. Adding signatures is done by selecting the Mail drop-down menu and clicking on Preferences (shortcut keys – ,). Navigate to the Signatures menu and feel free to create new signatures for different email accounts using the + button.
RoundCube webmail In RoundCube, signatures are located under the Settings menu. Once there, please select the third tab Identities. By default, you have only one identity for your account, click on it and a new menu will appear with various options like Display Name and Reply To text fields. The last one is Signature where you need to add your personalized text (by selecting the HTML signature box below, a new, extended field will load for you with additional settings). Feel free to click Save as soon as you have completed the changes to save them.
All domain registrations and renewals are non-refundable.
When a domain is registered/renewed, all registrar companies, including ours, pay including ours, pay a service fee to the top-level Registry organization that manages the particular extension.
As the Registries do not reverse dates and do not refund service fees, it is not possible for us to do this either.
You can renew one or several domains without renewing your hosting plan.
To do that, go to My Domains -> Registered Domains, where you will see all domains that you have registered through our company listed in a table.
You can renew one of them by clicking on its expiration date in the Expiration/Renewal column of the table.
If you want to renew several domains at once, tick the checkbox next to each one of them, then click on the Renew button that is located just above the table of domains.
A domain renewal page will come up and take you through the renewal steps.